Microsoft Excel Solver add-in Examples
The Microsoft Excel solver add-in is one of the features that makes creating engineering and financial models in a spreadsheet a powerful tool. To be called a "solver" doesn't do it justice, though, because it is really a powerful optimization algorithm. The tool was developed by Frontline Systems, Inc. (Solver.com) and they offer a great deal of information on their website, including products that expand upon the free Excel solver add in.
This article provides a couple of examples of how to use the Excel solver and call it using a VBA macro. If you want to experiment with using the Solver on financial models, you could try it out on one of my financial calculators such as the Home Mortgage Calculator. Excel's built-in Goal Seek tool is often enough to solve for x given y, but when you want to add multiple criteria and allow multiple inputs to change, that's where Solver comes in.
Note: You do not need to download the Solver add-in. If you don't see it as one of the menu items in your Tools menu (in Excel), then you need to go to Tools > Add-Ins... and check the box next to "Solver Add In".
Excel Solver Examples
Example 1: "Finding a Local Minimum Using the Excel Solver"
Our first example is to going to be very basic, but it will introduce common terms used in optimization, such as objective function, design variables, and constraints. Let's say we have the following equation, and we want to find the value of x that minimizes f subject to -1 <= x <= 5.
![]()
Our objective function is the value that we are going to minimize (f). The design variables are the variables that we are going to allow the Solver to change (just x in this example). We have two constraints: -1 <= x and x <= 5
A convenient way of setting up this problem in Excel is to make a clear distinction between the objective, design variables, and constraints. A screen shot of the example problem is shown below, including the graph of the function so that you can see that the answer should be somewhere between 0 and 2. We need to choose a starting value for x, so let's choose x = 1 because that is the average number of times Excel crashes on me per week.

Figure 1: Screenshot of example problem 1.
Cell B11 (The Objective Function): =B15^2-B15+2
To use the Excel solver add in (Tools > Solver ...), we choose our objective function, cell B11, to be the "Target Cell" and choose the "Min" option (see Figure 2 below). Our only design variable is x, so the only cell we are going to change is B15. After adding the two constraints, we click on the Solve button, and we find our answer (x=0.5).

Figure 2: Screenshot of the solver add in dialog box for sample problem 1.
Example 2: "Solving a System of Non-Linear Equations"
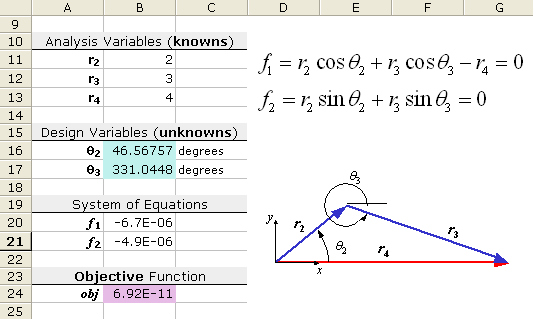
In this next practice problem, the solver is used to find values for the unknown angles (q2 and q3) in the following system of equations.

Notice that these equations are in implicit form (equal to zero). To solve the system, we will create an objective function that when minimized, drives both equations to zero. Minimizing the sum of the squares of each implicit equation will accomplish this.
The layout for this problem is shown in the screenshot below. The known variables are called analysis variables and will be treated as constants. Our unknowns, q2 and q3, are the design variables. For this example problem, we don't have any constraints.

Figure 3: Screenshot of example problem 2.
Is There Only ONE Solution?
The screenshot above shows one solution to the problem, but the solution will depend upon the starting values that you have chosen for the unknown angles. For example, try using the starting values, q2 = -30 degrees, and q3 = 0 degrees. You should get a different solution! The figure below is an example of a mechanism that can be described using these equations. The second solution is represented by the dashed lines.

Figure 4: Mechanism showing two possible configurations.
This example has demonstrated a very important point having to do with the Excel solver and optimization in general. The solution may depend upon the starting values. For optimization problems, this means that the solution may be only a local optimum.
Run the Solver Using a VBA Macro
If you need to solve the same system of equations or run an optimization routine a number of times using the same model, it is convenient to create a macro that can be run by pressing a single button. An easy way to set this up is to first record all the steps used to set up and run the solver. Let's use the problem from Example 2 above.

To Record a Solver Macro:
- Step 1: Start the macro recorder (Tools > Macro > Record New Macro ...).
- Step 2: Open the solver dialog box (Tools > Solver ...).
- Step 3: Clear any existing solver settings (Press the Reset All button).
- Step 4: Choose the target cell, design variables, and constraints and press the Solve button. Then select OK to accept the results.
- Step 5: Stop the macro recorder (Tools > Macro > Stop Recording ...).
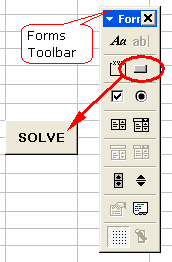
- Step 6: Add a button to the worksheet, using a button from the Forms toolbar. (If the Forms toolbar is not displayed, right-click on any toolbar and click on "Forms".)
- Step 7: Assign the macro you created to the button. (Right-click on the button and choose "Assign Macro ...")
Before the macro will work, a reference to the Solver VBA add-in functions must be added.
Adding the Solver Reference:
- Step 1: Edit the macro you just created (Tools > Macro > Macros... or Alt+F8). This will open up Visual Basic. You can also press Alt+F11 to open up VBA.
- Step 2: Add the Solver reference in visual basic (Tools > References..., then make sure that SOLVER is checked).
The VBA code for the Solver macro that was recorded for Example 2 is shown below.
Sub SolverMacro()
' Example Solver VBA Macro
    SolverReset
    SolverOk SetCell:="$B$24", _
             MaxMinVal:=2, _
             ValueOf:="0", _
             ByChange:="$B$16:$B$17"
    SolverSolve userFinish:=True
End Sub
To keep the Solver Results dialog box from showing up, the userFinish:=True option has been added to the SolverSolve function. For more help on using the Solver functions in VBA, search for "solver" using the VBA help system.
References
- "Optimization Tutorial," From solver.com, July 24, 2004.
- "Creating Visual Basic Macros that Use Microsoft Excel Solver," From support.microsoft.com, July 24, 2004.
- "Solver Uses Generalized Reduced Gradient Algorithm," Microsoft Knowledge Base Article - 82890, From support.microsoft.com, July 24, 2004.